
Biped Rigging And CAT Motion | 3D Character Animation
Biped Rigging And CAT Motion | 3D Character Animation Biped is a 3ds max component that you access from the create panel. once you create a biped, you animate it using the biped controls on the motion panel. biped provides tools to let you design and animate the figures and motion of characters. 3d max is a professional 3d computer designing software, which is used in creating 3d animation, games, models, images, etc. and plays a major role in the work of video game developers, film and tv studios. biped is the basic part of the animation in 3d max software.

Biped Rigged Character Needs Scaling Up - Autodesk Community
Biped Rigged Character Needs Scaling Up - Autodesk Community Topics:preparing the meshcreating the biped structureposing and creating a test animationsetting up the skin modifieradjusting envelopesadjusting vertex weig. So, here are our tips and tricks on how to rig a character in 3ds max biped that can be useful for you. biped uses quaternion rotation to control animation in the curve editor by default. the approach to animation is entirely different from the euler rotation used in maya by default. If you have your own character or you’ve download a model that needs to be rigged, the easiest way to create the correct skeleton structure is to use 3ds max’s biped tool. to create a rig that is compatible with anima, just follow these steps. start with new scene in 3ds max. create a new biped object in the scene. Each biped is an armature designed for animation, created as a linked hierarchy. the biped skeleton has special properties that make it instantly ready to animate. like humans, bipeds are especially designed to walk upright, although you can use bipeds to create multi legged creatures.

3Ds Max Biped Rigged Character Free Download - Britalk
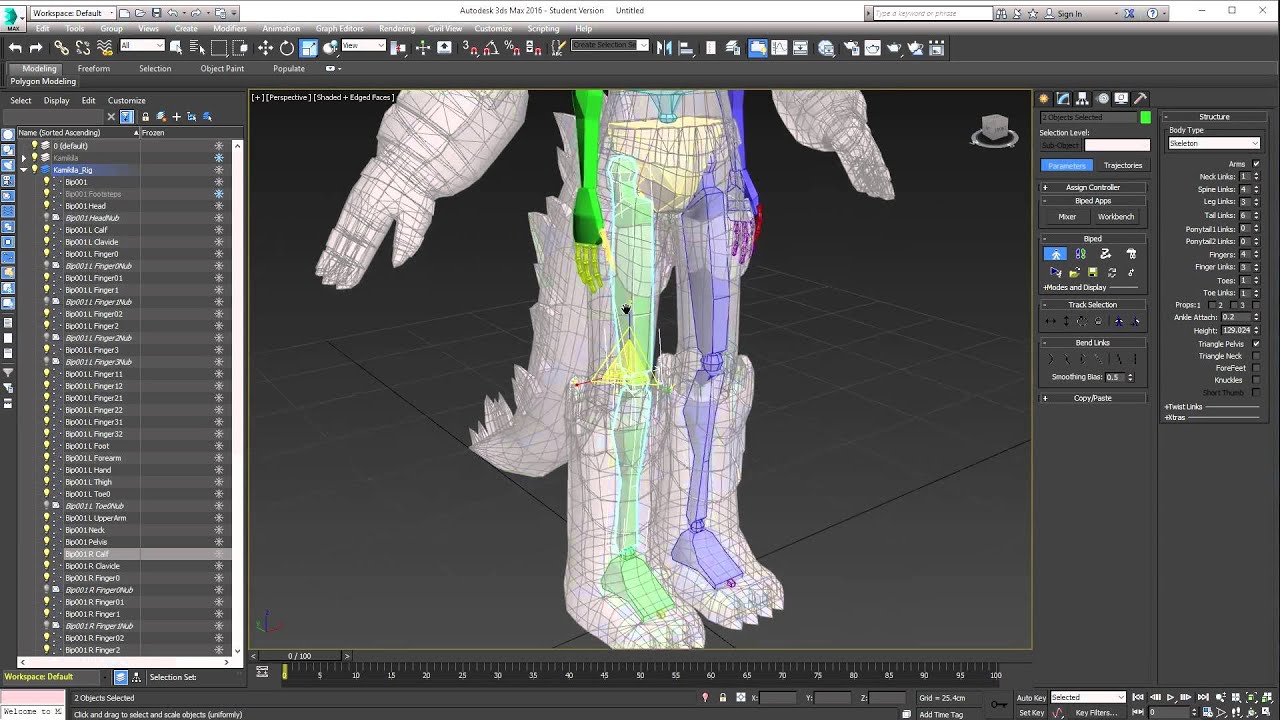
3Ds Max Biped Rigged Character Free Download - Britalk If you have your own character or you’ve download a model that needs to be rigged, the easiest way to create the correct skeleton structure is to use 3ds max’s biped tool. to create a rig that is compatible with anima, just follow these steps. start with new scene in 3ds max. create a new biped object in the scene. Each biped is an armature designed for animation, created as a linked hierarchy. the biped skeleton has special properties that make it instantly ready to animate. like humans, bipeds are especially designed to walk upright, although you can use bipeds to create multi legged creatures. Biped is a 3ds max component that you access from the create panel. once you create a biped, you animate it using the biped controls on the motion panel. biped. a fully functional, humanoid like rig with bones for arms, legs, spine, and head. customizable to fit different character proportions. Learn how to use a biped and the physique modifier to successfully rig you character for animation in 3ds max. more. The document provides instructions for rigging a 3d character mesh using a biped rig in 3ds max, including preparing the mesh, creating and setting up the biped, animating the biped, applying a skin modifier, and adjusting skin envelopes. 2. Once you have a character mesh, you can create a biped skeleton, or rig, to fit inside. use figure mode to set up your biped. before you position the skeleton, use controls on the structure rollout to alter the biped to match your mesh, setting the number of links for the spine, arms, neck, or fingers, or adding props to represent weapons or tools.
3DS Max - Rigging Biped FULL Tutorial
3DS Max - Rigging Biped FULL Tutorial
Related image with biped in 3ds max animating and rigging character model using biped


Related image with biped in 3ds max animating and rigging character model using biped


About "Biped In 3ds Max Animating And Rigging Character Model Using Biped"
Comments are closed.